

Dev Kay has been a user of Web 2.0 but has always wanted complete control over his data. However, after years of looking, Web 3.0 was released, and he found Web 3.0 which introduced blockchain technology and decentralization, but the verification of information was still done by the nodes of a network.
After some more years, he found the future! He found web5 which allows for personal data storage and control over who can access his data. Web5 also enables Dev Kay being a developer to concentrate on building delightful user experiences while restoring ownership of data and identity to individuals. We are going to learn what Dev Kay learned about this future, web 5.0.
What is Web5?
Web5 is a decentralized platform that prioritizes user’s privacy and ownership by providing a new identity layer for the web to enable decentralized applications and protocols. World Wide Web Consortium (W3C) created new identity standards and web5 provides a framework to apply those standards.
Web5 centers on self-owned identity, and user control over their data
Before we dive deeper into web5, let’s take a look at a brief overview of the evolution of the web.
A brief overview of the evolution of the web
The fundamental change in paradigm revolves around how data is handled across web models, specifically Web 2.0, Web 3.0, and Web 5.0.
Web 2.0:
The starting point of social media and web servers, with a flow of data from the user side and an active communication channel, was set up. There is a collection of user data by giant tech companies and used according to their preferences.
Web 3.0:
Introduced decentralization, but the verification of information was still done by the nodes of a network.
Web 5.0:
Complete decentralization and transparent form of the internet which ensures the complete control of user data is with users only.
What you should know about Web5
Below are the key components of Web5.
Decentralized Identifiers (DIDs):
DID is a W3C open standards alphanumeric string. Just like your email address and username, DIDs are self-owned identifiers based on cryptographic principles that enable identity authentication across all decentralized systems. DIDs are not stored in a centralized server, therefore, they can only be altered or deleted by whoever owns them.
did:example:123454klasjdfluio0089d8f888000
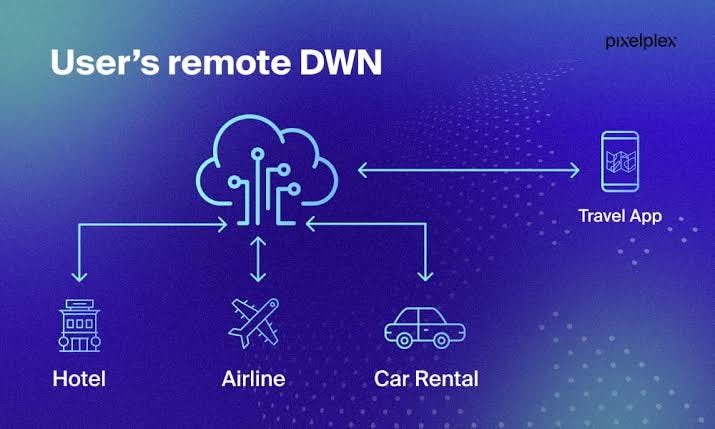
Decentralized Web Nodes (DWNs/ DWeb Nodes): A Decentralized Web Node (DWN) is a personal data storage where you can own, backup, send, and receive your data. It's a mechanism that one can use to locate authorized access data or public data related to a given Decentralized Identifier(DID).
Protocols:
Protocols are JSON Objects that you use to structure your data and help you decide who gets access to said data.
Mastering Web5 Development: A Guide to Efficient CRUD Operations
We’re going to learn how to CRUD (create, read, update, and delete) data from user’s personal data stores.
Before we can create, read, update, and delete data in web5, we’ll first need to:
Install Web5 SDK
Instantiate Web5 and create DID
Install Web5 SDK
prerequisites:
Node version 18 and above Link to Download node
Node Package Manager(npm) installed on system Check How
Make a New Directory
In your CLI:
 mkdir web5-app
 cd web5-app
Initialize a package.json and install web5
use npm to initialize a package.json file:
npm init -yUse NPM to install Web5:
This step will create a
package.jsonin the root of your project.npm install @web5/apiOpen
package.jsonand addmoduleas a type:{ "dependencies": { "@web5/api": "0.8.2" }, "type": "module" }Import web5
Create an
index.jsfile to write your application:touch index.jsFor Windows using PowerShell:
New-Item index.js -ItemType Fileignore any warnings you might now see.
Open the
index.jsin your editor and paste this code to import Web5:import { Web5 } from '@web5/api';Additional import for Node 18:
 /*
 Needs globalThis.crypto polyfill.
 This is *not* the crypto you're thinking of.
 It's the original crypto...CRYPTOGRAPHY.
 */
 import { webcrypto } from 'node:crypto';

 // @ts-ignore
 if (!globalThis.crypto) globalThis.crypto = webcrypto;
Additional Import for React-Native:
 /*
 React Native needs crypto.getRandomValues polyfill and sha512.
 This is *not* the crypto you're thinking of.
 It's the original crypto...CRYPTOGRAPHY.
 */
 import 'react-native-get-random-values';
 import { hmac } from '@noble/hashes/hmac';
 import { sha256 } from '@noble/hashes/sha256';
 import { sha512 } from '@noble/hashes/sha512';
 ed.etc.sha512Sync = (...m) => sha512(ed.etc.concatBytes(...m));
 ed.etc.sha512Async = (...m) => Promise.resolve(ed.etc.sha512Sync(...m));

 secp.etc.hmacSha256Sync = (k, ...m) =>
   hmac(sha256, k, secp.etc.concatBytes(...m));
 secp.etc.hmacSha256Async = (k, ...m) =>
   Promise.resolve(secp.etc.hmacSha256Sync(k, ...m));
We now have Web5 SDK installed, we can now instantiate Web5 and create DID
Instantiate Web5 and create DID
Just like your email is used for unique identifiers in Web2, In Web 5, we use identifiers that aren't tied to a centralized authority called a Decentralized Identifier (DID)
In your
index.js, adding the following code, you create a new instance ofWeb5:const { web5, did: aliceDid } = await Web5.connect();The
Web5class is an isolated API object for doing all Web5 related. Theconnect()function creates an instance of Web5 and also creates a new decentralized identifier or obtains a connection to an existing one.You'll utilize this Web5 instance to connect with other Web5 objects, including
didanddwn. Within the connect function we’re usingionas the DID method. Learn more about ION and other DID methods.Now we have been able to install web5 SDK and create a DID. we can now CRUD (create, read, update, and delete) data.
Create(Write) DWN Records
Now you can be able to create records in the user's Decentralized Web Node(DWN).
A DWN is a personal data store - message relay mechanism that entities can use to locate public or authorized access data related to a designated Decentralized Identifier(DID).
Add the following to index.js:
const { record } = await web5.dwn.records.create({
    data: 'Hello, Web5!',
    message: {
      dataFormat: 'text/plain',
    },
  });
Test your code:
Let's see what you just wrote to the DWN.
In index.js, add the following line and save your file:
console.log('writeResult', record);
Then from the terminal, run:
node index.js
You'll see the record that was written to the user's DWN. It will resemble:
writeResult _Record {}
Read DWN Records
If a user has given your app read permissions to their DWN, you can read their data by accessing it through the record property. If you lack access to the record, you can make a query to acquire it.
To return the text data stored in the record, add the following code to your index.js:
const readResult = await record.data.text();
**Test your code
**To see the record that was read from the DWN, add the following to index.js:
console.log('readResult', readResult)
Then from the terminal, run:
node index.js
The output will resemble:
Hello Web5
Update DWN Records
To update the record, call update on the record object itself.
Add the following to your index.js:
const updateResult = await record.update({
    data: 'Hello, Web5! I am updated.',
  });
Test your code
To see the record that was updated in the DWN, add the following to index.js:
console.log('updateResult', await record.data.text())
Then from the terminal, run:
node index.js
The output will resemble:
updateResult Hello, I'm updated!
Delete DWN Records
Given access from the user, similar to reading, your app can also delete records from their DWN. We will use the record object for the purpose of deleting the record.
Add the following to index.js:
const deleteResult = await record.delete();
Test your code
You can see the status of the deleted transaction by adding the following to index.js:
console.log('deleteResult', deleteResult)
Then from the terminal, run:
node index.js
The output will resemble:
{ status: { code: 202, detail: 'Accepted' } }
Conclusion
Congrats! Just like DevKay found the future, you just did and you've learned what Dev Kay learned about the future, Web5.
You've just learned what Web5 is all about and how to create a local DWN to serve as your user's personal data store. Based on a specified user's DID and appropriate authorized permissions, your app can update, read, write, or delete data from the user's DWN, while leaving them in full control over their content.